

Ah, spring is in the air — and so is all the dust and clutter that winter left behind. While everyone knows it’s the season of fresh starts and deep cleaning, there are a couple of areas that often get forgotten in the process. While many of the 11 spots we mention in this list may seem fairly minor or obvious, we bet there’s a good chance you wouldn’t have thought of it without us. You’re welcome.
- Take Inventory of Cleaning Supplies
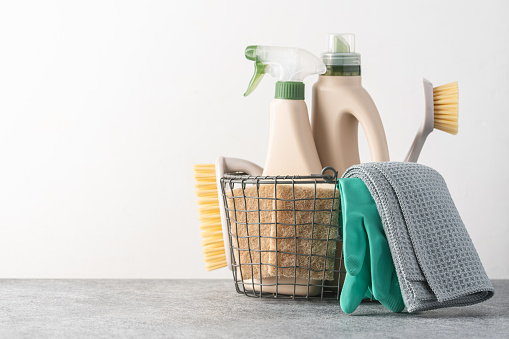
First things, first — you can’t start cleaning without the right supplies! There’s no point in trying to freshen up your home with old or dirty equipment. Make sure you have the appropriate solutions and disinfectants for the areas you’re cleaning, and swap out any old brooms or brush heads. Your cleaning closet needs some rejuvenation every now and then just as much as your home does! - Clean Your Toaster Tray
We know dumping crumbs from the toaster tray in the trash is probably something you do frequently, but when’s the last time you gave it a good scrub? Take the tray out and give it a deep soak in warm, soapy water. Or try an agent like Lime-A-Way for the pesky, stuck on grease and food remnants. The same applies to any and all small appliances in the kitchen. A thorough clean every now and then is your best chance of keeping unwanted pests and bugs from joining you in the kitchen now that your windows are open again! - Clear Your Drains
It may not be a mess you can see, but thanks to soap, water, and grime flowing through your drain every day, there’s going to be build up. But before you grab bleach or ammonia that can cause erosion over time, try a more natural solution. Pour 1⁄2 cup of baking soda and one cup of vinegar down the drain separately and then run some hot water to rinse. By giving your sink pipes and garbage disposal a deep clean every so often, you can prevent bigger clogs and issues, while also eliminating any foul smells that come along with it. - Toss Old Beauty Products
We’re guessing there’s a good chance your makeup drawer or bags have some items in there older than 3-6 months. It happens to the best of us. But this is the shelf life of most cream or gel-based makeup products — so if you do, it’s time to say goodbye. Any girl knows that makeup can pile up quickly, so start by sorting through what you use on a daily basis, for special occasions, and your back up supply. Organize them into categories, like hair, eyes, lips, etc. The better you can see what you have, the better you can stay on top of regular audits. Oh, and either use that free sample, or throw it out now. - Dump Your Junk Mail
In today’s highly digital/paperless world, somehow we all still end up with a ton of traditional junk mail. Whether you keep forgetting to cancel that subscription or it’s those never-ending donation requests, take a minute to weed through everything you’ve accumulated before tossing away the trash or filing things you want to keep. Empty your recycling bin and make an effort to cancel or update preferences to anything you don’t want to receive anymore wherever you can. And if anything is being tossed with any personal info on it like bills or credit card offers, make sure you put them through the shredder first. - Sort Desk Drawers & Electronics
Desk drawers are notorious for becoming a black hole to all things random. But the out of sight, out of mind philosophy is never good in this case — especially when it means packets of ketchup sitting in there for months. Rummage through each of these drawers to determine what’s still useful and what needs to go. For the items that stay, sort them by type and try utilizing a drawer organizer to keep everything in place and in sight.For electronics — before tossing old chargers and cords, read hup on local guidance for e-waste to make sure you’re disposing properly. And consider different donations or mail-back programs that can put those old items to use again in another home.
- Deep Clean Your Washer and Dryer
Yep, even your washer needs a good wash every now and then too. Run a cycle using white vinegar and baking soda. A store-bought, pre-mixed cleaner works just as well too. And don’t forget the lint filter. You should be cleaning this out after every load, but the areas within the vents need attention too to ensure built-up debris doesn’t become a fire hazard. Use a duct brush or vacuum to clear out all the lint that may be trapped within the ventilation units. - Rotate Your Mattress
Don’t wait until you have trouble sleeping to give your mattress a turn. Even when only one person is using a bed, it can still get lumpy or uneven over time — especially if you often sleep on the same side. You may notice some sagging in areas simply by looking, or it may be a little less obvious, but it doesn’t hurt to switch it up. Strip the bedding and either rotate the mattress so the foot becomes the head or flip the mattress over so the bottom becomes the top (you get the idea). Newer mattress designs should eliminate the need to flip, so make your own assessment. - Trash Old Spices & Canned Goods
Sure, the best thing about non-perishables is how long they last — but there is a limit (ironic, we know). Go through all your spices and canned goods to check expiration dates. Canned meats and veggies can last up to 2-5 years, but high-acid, canned fruits and tomatoes only last 12-18 months. Try using a first-in, first-out rule to keep all canned items in your pantry at their peak quality. - Get Underneath Area Rugs & Furniture
Usually when we run a vacuum through the house, we tend to stick to those easy-to-reach spots — ya know, the ones that don’t require you to bend over backwards. But because of that same reason, those spots need extra love this time of year. It’s time to really put that vacuum hose and/or those muscles to work. Move furniture and roll up rugs and rug pads to clean underneath. And put in some extra effort to reach under the bed or larger furniture pieces where dust goes to hide. - Remove Wall/Floors for Scuffs
Check the walls and floors for any marks caused by shoes, furniture, or toys. This includes underneath islands or bars too. Use a damp, soft cloth with a little dish soap (a Magic Eraser works great too) to remove any scuffs and dab some touch up paint on any dings or scrapes. It’s a little effort for a much cleaner look.
For more ways to ensure your home is as clean, healthy, and comfortable as possible this Spring, contact the experts at Madsen today.